Webinar Recap: Imaging Complex Structure with Luxendo Light-Sheet Microscopy and CLARITY Tissue Clearing
Deep Tissue Imaging with CLARITY and Light-Sheet Microscopy
Using conventional light microscopy techniques to image large or dense biological samples can be challenging due to light scattering properties of tissues and mismatched refractive indices. The combination of tissue clearing and light-sheet microscopy enables fast, gentle, and high-resolution imaging deep within thick samples.
In this recap of the webinar presented by Sharla White, Ph.D., Vice President of Research and Development at ClearLight Bio, the practical applications and best-known methods of combined light-sheet fluorescence microscopy (LSFM) and CLARITY tissue clearing are presented. An example of CLARITY tissue clearing on mouse intestines is also presented, showcasing how imaging with LSFM provides added insight to the unique structure, shape, and layers of the intestine.
Contents include:
KEYWORDS: Organoids; Case Study; Cleared Sample Imaging; Tissue Clearing; CLARITY; Refractive Index Equilibrium; LSFM; SPIM
Introduction
Using conventional light microscopy techniques to image large or dense biological samples can be challenging due to light scattering properties of tissues and mismatched refractive indices. The combination of tissue clearing and light-sheet microscopy enables the fast, gentle, and high-resolution imaging deep within thick samples. In this recap of the webinar presented by Sharla White, Ph.D., Vice President of Research and Development at ClearLight Bio, the practical applications and best-known methods of combined light-sheet fluorescence microscopy (LSFM) and CLARITY tissue clearing are presented. An example of CLARITY tissue clearing on mouse intestines is also presented, showcasing how imaging with LSFM provides added insight to the unique structure, shape, and layers of the intestine.
Why Tissue Clearing Is Necessary
Organs and tissues are comprised of various components that have different refractive indices. For example, heme and calcification impede the penetration of light within a sample, while melanin absorbs light. This variation results in light scattering when imaged with traditional light microscopy methods and without clearing. By performing tissue clearing, the light-scattering components are removed and an additional refractive index match enables imaging of the proteins or molecules of interest. While tissue clearing may not be necessary for every sample type, it is especially crucial for thick and complex samples—such as tissue sections or organoids thicker than 100 µm—because as sample thickness or complexity increases, so does the impact of light scattering and autofluorescence. Ultimately, tissue clearing enables higher quality imaging throughout the depth of the sample. There are many different techniques for clearing tissues that fall into three main categories: aqueous, hyperhydration, and organic. This work discusses the aqueous and hydrogel-based clearing technique, CLARITY, which enables the maintenance of structure as light-scattering components are removed. Regardless of the technique used, the goal of clearing is to establish a uniform refractive index equilibrium, which is a key element for imaging with a light-sheet fluorescence microscope.
CLARITY Tissue Clearing Workflow
CLARITY technology can be implemented with a very straightforward approach:
- Prepare fixed tissue— Tissue can be fixed with either 4% paraformaldehyde, or 10% neutral buffer formula. Tissue used for CLARITY can be fresh, frozen, or embedded in a FFPE block.
- Embedding the hydrogen matrix— During this first step, hydrogel monomers form crosslinks with nucleic hydrogel acids and proteins in the sample.
- Biomolecule functionalization— The sample undergoes a degassing and a vacuum process that removes the oxygen from the system. This is important for the subsequent polymerization step.
- Polymerization— This step essentially locks the scaffold into place.
- Lipid clearing— Light-scattering lipids are removed.
- Immunostaining— Labeling sample with antibody or biomarker. Particularly, 3D IHC enables immunostaining deep within tissues and takes advantage of fluorophores to collect 3D images.
- 3D imaging and analysis— Collect 3D images with an LSFM. Use analysis software to create 3D renderings.
Light-Sheet Fluorescence Microscopy as a Tool for Cleared Tissue Imaging
Light-sheet fluorescence microscopy (LSFM), also known as selective plane illumination microscopy (SPIM), is a useful tool for imaging cleared tissues and organoids. With LSFM, the fluorescent excitation and detection beam paths are decoupled from one another, enabling the selective illumination of the single focal plane of the detection objective lens from which image information is acquired. In contrast, for confocal laser scanning microscopy (CLSM), the laser is continually scanned through the entirety of the sample, even when trying to obtain image information from a single plane. This conceptual advantage of LSFM minimizes the amount of photobleaching imposed on the sample. Additionally, because of the selective illumination of a single plane, the imaging process happens significantly faster than with confocal. For example, to image a whole mouse brain with a 20x objective at high resolution can take several days with CLSM. Comparatively, imaging with the same resolution and image contrast would take just a few hours with LSFM.
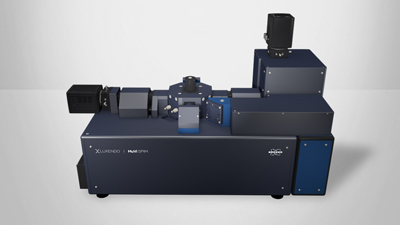
ClearLight utilizes a Luxendo MuVi SPIM single-detection microscope with both 4x and 20x cleared-sample octagons. This microscope has one detection objective and two illumination objectives, and six laser lines (405, 488, 561, 642, 685, and 785 nm), which include IR channels that confocal microscopes typically do not have. The system integrates with Bruker LuxControl software for seamless image acquisition and large data processing.
While LSFM is advantageous for cleared sample imaging, there are several factors to consider to optimize imaging results. First, the sample is limited to the size of the chamber. Also, the sample must be properly cleared for the best results. Variation in refractive index of components can scatter the laser light-sheet, resulting in a distorted image. Finally, larger samples are best imaged on lower magnifications—such as 4x or 10x—because it enables a large field of view, which can help to identify a field of interest within the sample.
Case study: Imaging a CLARITY-Cleared Mouse Intestine with LSFM
Dr. White presented a case study of clearing mouse intestine tissue and imaging on the MuVi SPIM. First, a mouse intestine was cut into thirds and subjected to three different treatments (see Figure 1). Clearing with CLARITY and refractive index matching provides the most optimized sample for LSFM imaging.


Another example showcased a smaller intestinal tissue section that was cleared over the course of two days with CLARITY (see Figure 2). After two days of clearing with CLARITY, the tissue is most suitable for imaging with LSFM.
Next, the cleared samples were imaged on the MuVi SPIM. The variations in small intestine sample preparation provide different perspectives on the tissues. Figure 3 shows three different preparation and mounting techniques for the small intestine, which was cut into thirds. In Figure 3a, the sample was left intact and rolled/layered atop itself, thus maintaining the tubular shape of the intestine. In Figure 3b, the sample was layered atop itself, not in any particular shape, which allows more insight into the villi. Figure 3c shows the fileted sample that is not layered atop itself. Because of this flat sample preparation, the user can focus on the structure of both the cilia and the villi. All three images were collected as 10x tile scans and comprised of 300 to 400 fields that have been stitched together via image processing. These images show variation in expression across sample preparation methods, even though they were stained with the same multiplex panel.


The next example used another multiplex panel in the small intestine versus the large intestine at 20X magnification (see Figure 4). While there are some similarities due to both samples being intestinal tissues, they have relatively distinct profile expressions. With fluorescence microscopy, one can turn the imaging channels on and off to investigate colocalization of proteins.
Finally, a profile of a small section of the intestine was imaged at 20X magnification (see Figure 5). The focus is on the villi, which allows the intestine to curl up to its natural shape. The benefit here is to be able to focus on the profile perspective that was not possible when the tissue was left intact. In general, with cleared tissue imaging, it is helpful to start at a higher magnification and then zero in on more specific structure and detail once an interesting portion has been identified. Overall, the intestine is a strong example of a complex tissue that benefits from CLARITY, 3D IHC, and LSFM imaging.

Conclusion
Proper tissue clearing can provide valuable insights in imaging experiments involving large tissues or organoids. CLARITY and 3D IHC enable the user to maintain tissue structure and to retain the biomarker targets. LSFM imaging is very fast, acquires data at high resolution, and enables a wider range of image imaging options compared to confocal, such as a larger working distance range. Ultimately, pairing clearing techniques, particularly CLARITY, with LSFM allows for successful imaging of intact or sectioned complex tissues that will contribute to the advancement of research across life sciences disciplines.
Author
Lina Streich, Bruker Application Specialist (lina.streich@bruker.com)
©2022 Bruker Corporation. LuxControl and MuVi SPIM are trademarks of Bruker. All other trademarks are the property of their respective companies. All rights reserved. AN2004, Rev. A0.