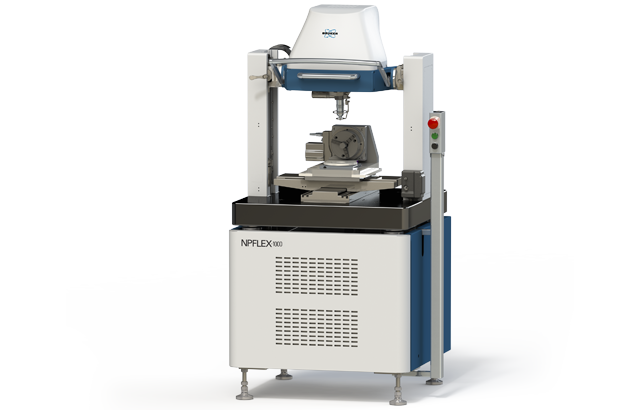
NPFLEX-1000
NPFLEX-1000
The NPFLEX-1000 floor-standing white light interferometer (WLI) offers the most accurate and flexible solution for evaluating nano- to macro-features on large parts in precision machining QA/QC. Key features include a large form-factor open-gantry, robust bridge architecture, and swivel head design with 300 mm of distance between stage and objectives. This exclusive design allows NPFLEX-1000 to accomodate the widest variety of sample sizes and shapes and access the most challenging orientations.
With this unique design, combined with the ease-of-use advantages of our next-generation optical profiler technology, NPFLEX-1000 delivers gage-capable surface texture and roughness measurements with the throughput and repeatability operators need in dynamic sectors such as automotive, medical, and large-scale additive manufacturing.
Optimized for Productivity Both in the Lab and on the Factory Floor
The NPFLEX-1000 delivers the most accurate and repeatable surface texture and roughness metrology for almost any precision manufacturing application.
The NPFLEX-1000 delivers a unique range of critical advantages:
- Ultimate large-part and high-slope surface compatibility reduces sample preparation and increases the range of measurement surfaces accessible per part;
- Exceptional ease-of-use empowers operators at any experience level to obtain expert results;
- Super-fast automated measurement and analysis routines provide decreased time-to-result; and
- Highly robust bridge architecture and integrated vibration isolation offer long-term accuracy and reliability for production environments.
Extreme Part Size and Shape Freedom
The NPFLEX-1000 delivers ultimate sample-size freedom and the unique ability to measure high-slope surfaces and difficult orientations on large parts thanks to Bruker's most innovative and exclusive technology, including:
- Large gantry and swivel head design: Provide unique access to difficult orientations on large parts;
- Long focal-length objectives: Expands the possibilities for sample types;
- Bore-Scope Objective: Captures 3D data as far as 150 mm down the inner walls of cylinders or bores; and
- Fold-Mirror: Offers non-destructive analysis of inside diameters of bores and cylinders and along sidewalls of bowl shapes with high slopes up to 70°.
Customizable, Application-Specific Configurations
The NPFLEX-1000 system offers many options to customize its operation for specific applications.
Key features include:
- Open-access robust bridge architecture;
- Material-insensitive measurement;
- Allows custom fixtures and mounts (e.g., a vacuum wafer chuck or universal sample mounting kit); and
- For specialized applications, customized routines can be created specifically for your requirements.
Additional accessories further adapt the system to fit unique samples and applications. Contact us for more information.
▲ CNC-milled part (p.7)
Built for Speed
The NPFLEX-1000 offers extreme usability at uncompromising speeds, enabling critical improvements in throughput for production environments.
Key features include:
- Minimal sample preparation and measurement setup time;
- Fast, automated measurements and full analysis within 10 seconds;
- The most motorized stages available, allowing for easy, automated movement to any location on any part without remounting; and
- Quick and easy part switching for performing measurements on multiple surfaces.
Always Accurate and Repeatable
Whenever tight control of environmental factors is not possible, the NPFLEX-1000 still maintains excellent reproducibility thanks to its integrated vibration isolation and self-calibration. A built-in reference signal laser interferometer continuously calibrates the temperature to account for environmental influences and to always ensure high accuracy and reproducible measurements, ideal for applications that require absolute long-term stability.
Surface-Independent Metrology for Application-Specific Solutions
The flexibility of the NPFLEX-1000 is designed to answer the roughness and surface texture measurement questions that arise in precision machining QA/QC for sectors such as automotive, medical, and large-scale additive manufacturing. Some of these QA/QC studies include:
Bruker's Vision64® Instrument Control and Analysis
NPFLEX-1000 is powered by Vision64 software, the industry’s most functional and user-friendly graphical interface. This full-featured software includes:
Advanced Find Surface
The Advanced Find Surface feature enables any user to obtain quality results regardless of operator experience level, even in multi-user environments.
It not only enables auto-focus, but also adjusts key illumination parameters such as the intensity of the LED ring light. This allows uncompromised metrology on varied material surfaces with improved user experience, extreme operator ease, and faster time-to-result.
VisionXpress
Between the easy-to-use VisionXpress™ interface with its standard test library for multi-user environments, the award-winning full-featured Vision64 interface for advanced setup and automated analysis, and the Advanced Production interface for ultimate automation with minimal user intervention, you can select the most suitable solution for your unique metrology needs, without compromise. This unique capability enables uncompromised metrology on any surface, with increased throughput.
Universal Scanning Interferometry
The adaptive surface intelligence of USI mode automatically adjusts algorithm parameters for optimum results on different surface textures in the same field of view, even on surfaces with differing contrast, intensity, and heights. This ability to automatically sense the type of surface and provide the most accurate areal metrology makes it one of the easiest and most robust measurement methods for almost any surface, transparent to opaque, with a vertical range up to 120 µm.
How Can We Help?
Bruker partners with our customers to solve real-world application issues. We develop next-generation technologies and help customers select the right system and accessories. This partnership continues through training and extended service, long after the tools are sold.
Our highly trained team of support engineers, application scientists and subject-matter experts are wholly dedicated to maximizing your productivity with system service and upgrades, as well as application support and training.
