Guide to FT-IR Microscopy
What is infrared (FT-IR) microscopy?
Infrared or FT-IR microscopy (µ-FT-IR) combines FT-IR spectroscopy with traditional light microscopy. This provides a very streamlined, “point and shoot” approach to chemical analysis of very small structures. Typically, a sample is first visually examined and from there, a region of interest on the sample can be selected for chemical analysis or identification.
This technique is particularly well suited for examining small objects that may be difficult to analyze precisely using traditional FT-IR spectroscopy, such as small particles, thin coatings on surfaces, or single crystals. It’s also incredibly useful in failure analysis, where any material can be investigated to search for even the smallest sign of damage.
How does an infrared microscope work?
The technique that allows infrared microscopy to analyze and identify samples is the same as what occurs in FT-IR spectroscopy. First, IR light shines on the sample and interacts with it. That IR light is then detected to create the FT-IR spectrum, which is like a “chemical fingerprint” of the sample. The information contained in the spectrum can be used to identify, characterize, and quantify the different substances that are in the sample.
Depending on the sample, the FT-IR analysis can be performed in several ways:
- Transmission
- Reflection
- Attenuated total reflectance (ATR)
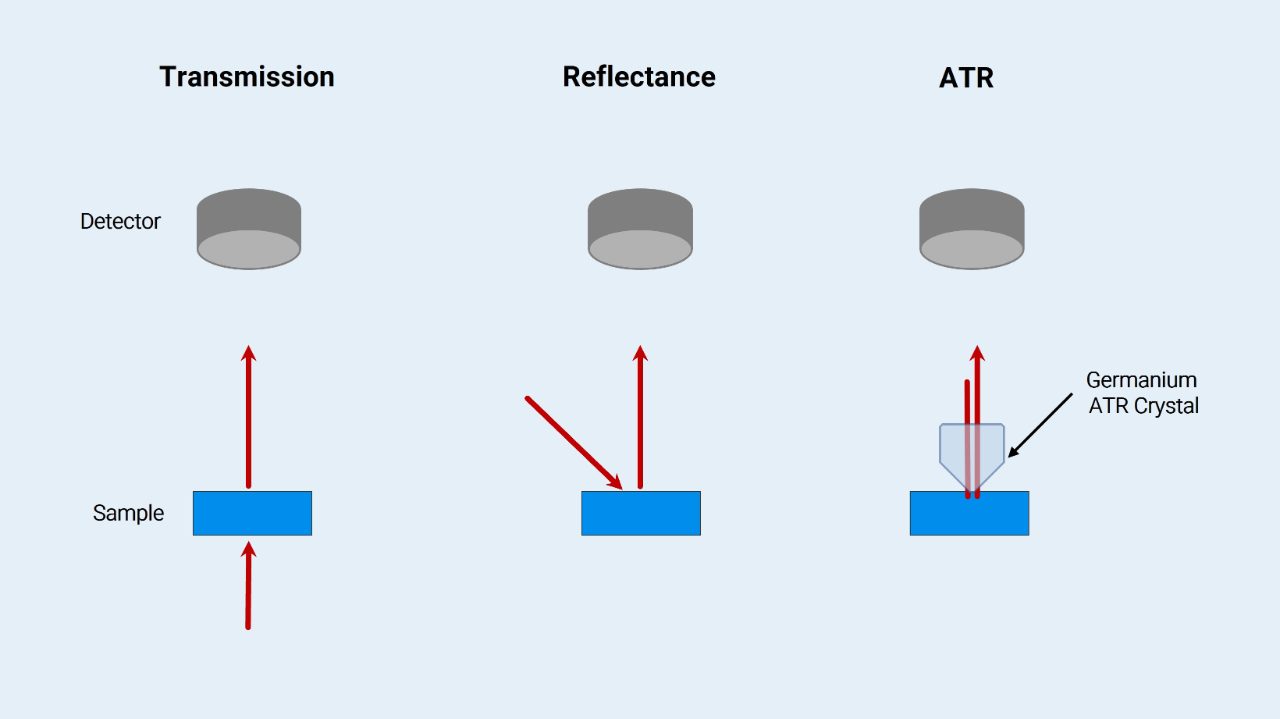
For transmission, the IR light travels completely though the sample and is then detected. To use transmission in FT-IR microscopy, samples must usually be prepared in a certain way, e.g. thinly cut by a microtome. Reflectance is used to analyze solid samples where the IR light is reflected off the sample surface and then detected. It can also analyze very thin samples that are places on a reflective substrate, such as thin tissues or coatings.
As both, reflectance and transmission, suffer from certain sample preparation limitations, another technique has become standard in FT-IR microscopy: Attenuated total reflectance, or ATR. ATR directs the IR light through a crystal, typically made of germanium, which presses down on the sample.
The IR light interacts with the first few microns of the sample, and then travels back through the crystal to be detected. ATR is the most widely used measurement technique since it can measure a wide variety of sample types, requires little to no sample preparation, and has provides excellent resolution when used in microscopy.
Combining visible and infrared light
An FT-IR microscope has more going on inside the machine than just the FT-IR spectrometer. So let’s break down how exactly we can combine a microscope and this powerful chemical identification technique.
To combine the FT-IR spectrometer and the microscope both visible light and IR light must be able to move through the microscope to shine on the sample. However, this creates a challenge right from the beginning. That’s because light microscopy usually uses glass for many of the components in the microscope, such as the sample slides and the objective lenses. IR light, however, can’t travel through glass!
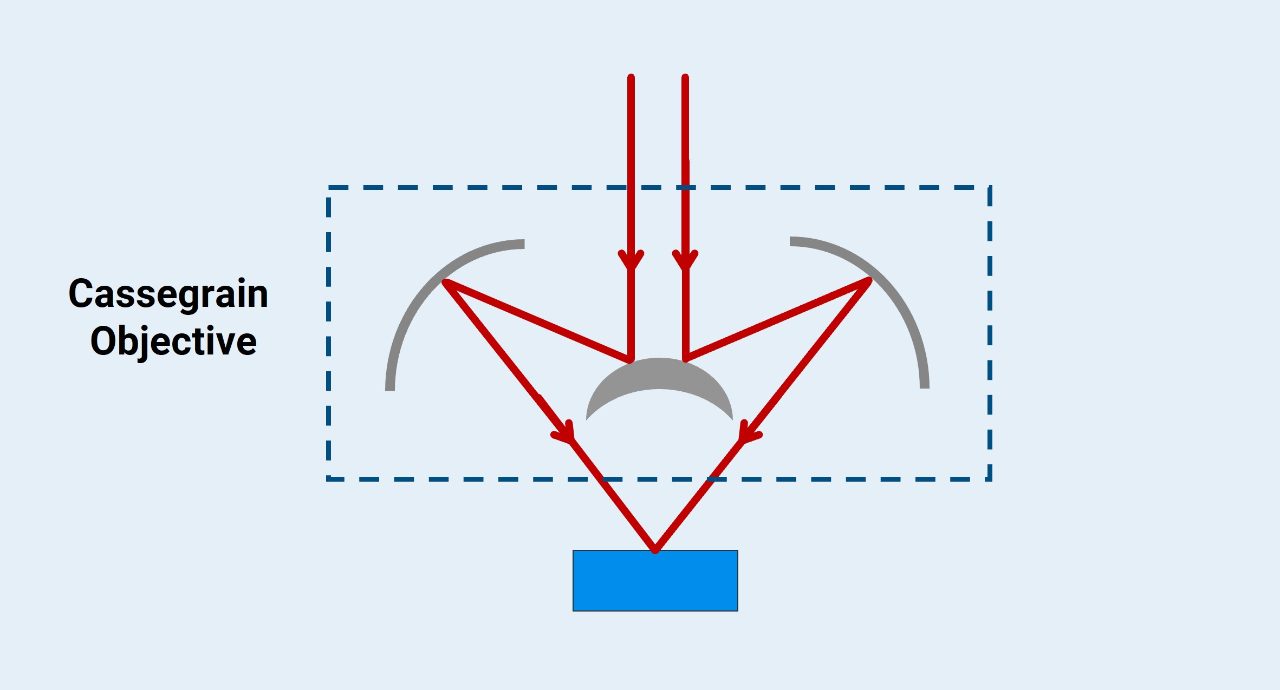
There are two options for getting around this hurdle. First, the lenses and components of the microscope can be made of materials that IR light can easily pass through. However, the more common solution is to use a series of mirrors, typically made of aluminum, to direct light around the microscope. Carefully arranged mirrors can even be used to create objectives, which are called Cassegrain objectives.
Inside the infrared microscope
With the correct optics, the visible light can reach the sample and the microscope portion of the instrument works just as expected. While looking at the sample using the microscope, a region of the sample is selected for FT-IR analysis. Using ATR, transmission, or reflection, the IR light interacts with the sample in the region of interest and then is sent to a detector. But before the IR light reaches the detector, it is sent through an aperture to ensure only the IR light corresponding to the region of interest reaches the detector for analysis.
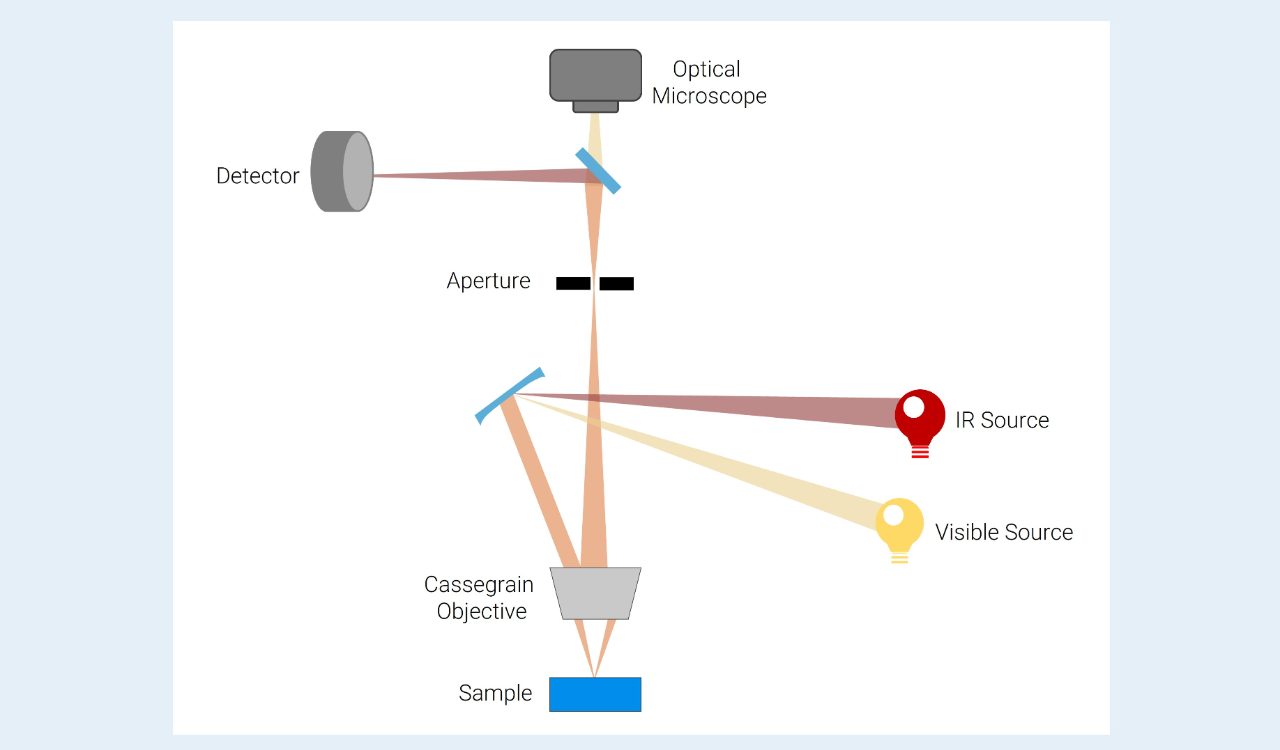
Once the IR light reaches the detector, the FT-IR spectrum is created. This gives a wealth of chemical information about the sample in the region of interest. Computer software can even automatically identify the chemical make-up of the sample in the selected region.
Detectors for FT-IR microscopes
There are several detector options that can be used for FT-IR microscopy, which fit into two basic categories: single element detectors and imaging detectors. Single element detectors are used to investigate specific areas in a sample, while imaging detectors are used to create chemical images. Chemical imaging is a topic deserving of its own article, so we’ll focus on the single element detectors here.
There are three kinds of single element detectors commonly used in an IR microscope:
- DLaTGS
- TE-MCT
- LN-MCT
Deuterated Lanthanum α-Alanine doped TriGlycine Sulphate (DLaTGS) detectors are extremely versatile detectors which don’t require cooling to function, making them very easy to use. However, they can’t create high quality spectra for extremely small samples, or when a very small aperture is used.
To analyze smaller regions or smaller samples, below 100 µm, a Thermoelectrically cooled Mercury Cadmium Telluride (TE-MCT) detector can be used. This kind of detector is continually cooled by a peltier element, requiring no maintenance or cryogen.
To analyze the smallest samples that are 10 µm or below in size, Liquid Nitrogen cooled MCTs (LN-MCTs) are the best option. However, it can take some time for the detector to cool down enough for use after being filled with liquid nitrogen. These detectors also require the most work to maintain as the liquid nitrogen needs to be continuously replenished when the microscope is used for prolonged periods.
| Detector | Sample Size | Cooling |
| DLaTGS | > 50 µm | No, or only temperature stabilized |
| TE-MCT | > 10 µm | Continuous thermoelectric cooling |
| LN-MCT | > 5 µm | Liquid nitrogen |
All about apertures
Apertures are an important component inside the FT-IR microscope as they allow us to selectively analyze the IR light that interacted with the region of the sample we’re interested in. There are two aperture styles that can be used to remove the undesired IR light prior to detection: pinhole apertures and knife edge apertures.
A pinhole aperture is the simplest and cheapest option. It consists of a wheel with circular apertures of various sizes. The wheel is simply turned to select the aperture size that is best suited for that experiment. Knife edge apertures are more expensive, but much more precise.
A knife edge aperture consists of a rectangular opening with four blades that can each be moved independently. These blades are used to exactly select the area of interest on the sample.
Knife edge apertures have the advantage here since the region of interest can be precisely selected to only let the IR light corresponding to that region reach the detector. Pinhole apertures can only approximately let light through that corresponds to the region of interest, as the shape of the aperture can’t be controlled.
For all that, it must be noted that by using an aperture we are "throwing away" IR light. That means that applying a very small aperture (e.g. 50 µm) will require a very sensitive detector. Of course, measurement time can be increased in some cases, but result will vary.

Once the IR light reaches the detector, the FT-IR spectrum is created. This gives a wealth of chemical information about the sample in the region of interest. Computer software can even automatically identify the chemical make-up of the sample in the selected region.
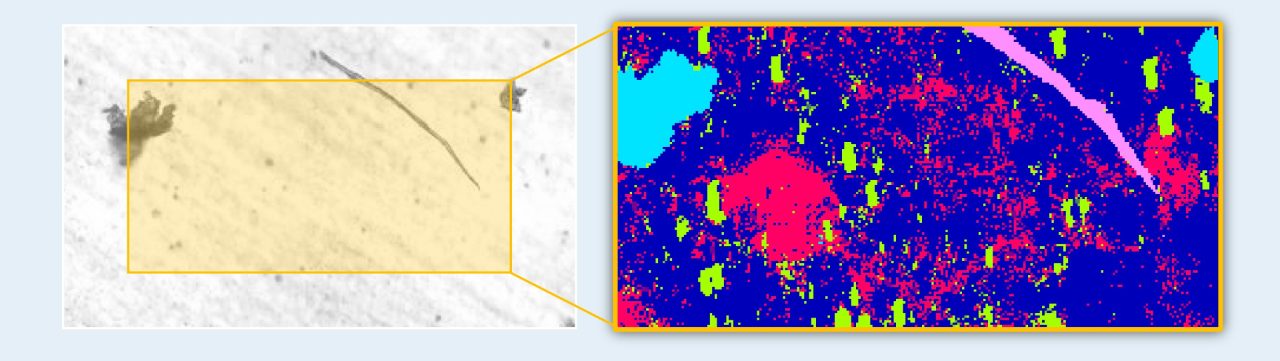
About infared (FT-IR) imaging
To create these infrared images, special imaging detectors are used to ensure the image is created efficiently and with high resolution. There are two types of imaging detectors: focal place array (FPA) or line array detector. These detectors can both capture many FT-IR spectra within the field of view at one time. However, the FPA detectors hold the advantage in chemical imaging as they are faster, more precise, and can be calibrated by laser.
Applications of FT-IR microscopy
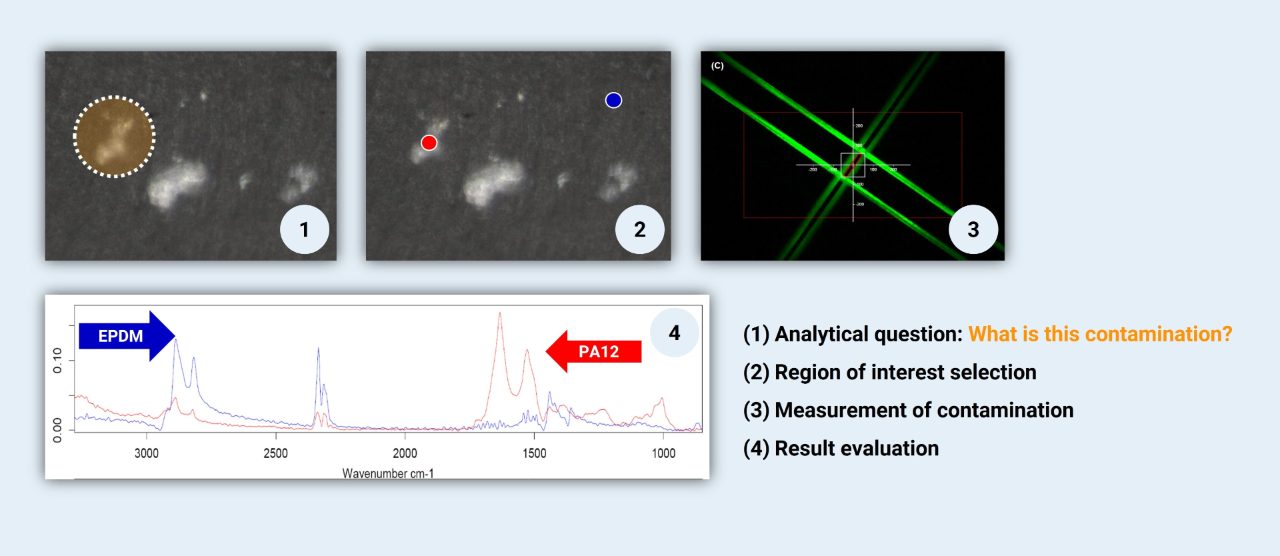
FT-IR microscopy is extremely useful for any application that involves analyzing a sample that’s small, thin, or requires precise measurements. That makes is the technique of choice for investigating particles, films, and coatings whether it’s for quality control, failure analysis, competitor analysis, or research.
Analyzing particles is necessary in many industries to check for contaminants, and it’s also a key part of environmental research to investigate pollution. Environmental researchers are currently racing to understand the composition of microplastic particles found in our water, soil, and air to better understand the impacts of this kind of pollution. FT-IR microscopy is an important technique for studying microplastics, as it can quickly determine the chemical makeup of small particles in nearly any kind of sample.
FT-IR microscopy is also an important technique for performing multilayer analysis to determine both the composition and thickness of layers. This is commonly done in the polymer industry for example, where multilayer and composite materials need to be analyzed to ensure materials are made to specification and are free from defects.
Similarly, IR microscopy excels at analyzing thin coatings. In industry, products like anti-corrosion coatings on metals, adhesive layers on packaging, or diamond coatings on drill bits all have to be checked for uniformity and contamination.
Then there’s fields like forensics which use FT-IR microscopy to analyze a wide range of samples since even the tiniest detail can be important in this field. The smallest fibers and particles must be identified to be used as evidence. Multilayer analysis must be performed to identify paint samples to solve hit and run cases. Larger samples can even be investigated to detect counterfeits.
The applications of FT-IR microscopy apply to a wide range of industries. And of course, once chemical imaging is added, the variety of applications becomes even more diverse to include applications like scanning large samples for defects, imaging large tissue samples, or entire pharmaceutical tablets at once.
Frequently asked questions about FT-IR microscopy
1. What is FT-IR microscopy?
It is the application of an FT-IR measurement to a microscopic sample. Therefore, it combines traditional microscopy and chemical analysis into one tool. It is ideally used in failure analysis and material science.
2. Why does an FT-IR microscope need apertures?
As in IR microscopy very sensitive detectors are used, it is important to avoid saturating the IR detector. Additionally, Apertures allow to fit the measurement spot to the size of the sample to acquire a much better spectrum. Imagine a 10 µm polyethylene flake embedded inside a PET matrix. If in that case you would use a 30 µm aperture instead of a fitting 10 µm one, the resulting spectrum would contain much more contribution of the PET matrix, than of the PE contamination.
3. What's the smallest object FT-IR microscopy can analyze?
This depends on the microscope, detector and measurement technique used. But an HYPERION, equipped with a FPA detector and using ATR microscopy can analyze objects at the diffraction limit of IR light, thus ≤ 1 µm.
3. Why does an Germanium-ATR crystal increase the resolution?
Germanium has (compared to many other ATR materials) a very high refractive index. As it is in direct contact with the sample, this means it acts as a solid immersion lense. This increases spatial resolution by a factor of 4 (refractive index) compared to standard transmission measurements.
4. What is FT-IR imaging?
FT-IR imaging is one way to create said spatially resolved chemical images. Each pixel of these images consists of a whole IR spectrum. By interpreting the individual spectra, interesting sample regions can be detected and evaluated.


